Background
For the past seven years, I’ve switched between various rental servers.
I started blogging on FC2 in 2017, and when I transitioned to WordPress a few months later, I signed up for a WordPress-only server.
Around 2019, I wanted to test web apps alongside my blog.
However, the dedicated server only supported WordPress, so I switched to a more flexible hosting service.
By 2023, I wanted to leverage the domain authority and AdSense benefits of my original blog.
To avoid reapplying for ads, I decided to use a subdomain.
However, enabling SSL on a subdomain required domain transfer.
(Without it, I couldn’t use the free SSL service, among other limitations.)
To reduce costs and simplify things, I moved all content to a single server and transferred the domain there.
Unfortunately, this migration failed to meet expectations: site speed dropped drastically and SEO suffered.
Frustrated, and seeking flexibility like Node.js and SSR support, I decided to go with a VPS.
Of course, greater control comes with added responsibility—especially for security.
This migration is also part of my learning journey.
Getting Started
There are many VPS providers, but I chose Sakura Internet’s VPS.
It’s a well-known company with great documentation and cost efficiency.
This article covers everything from signing up to connecting via SSH using public key authentication.
From Signup to SSH Public Key Authentication
Server Contract & Account Registration
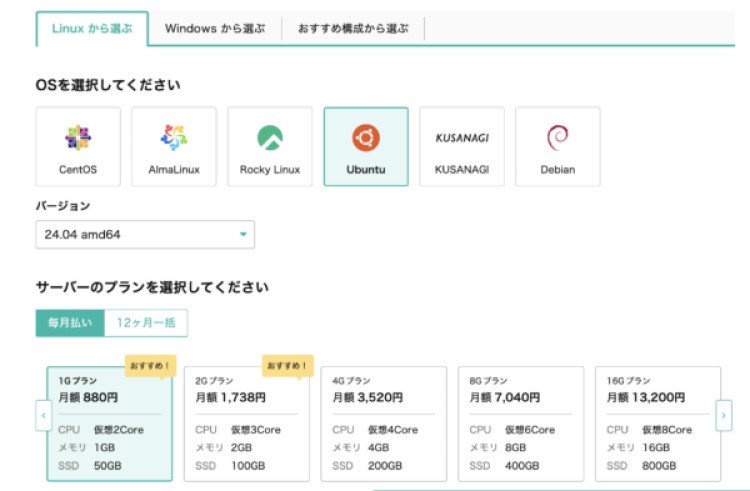
I selected Ubuntu 24.04 amd64 (latest as of June 2024) with the 1GB plan.
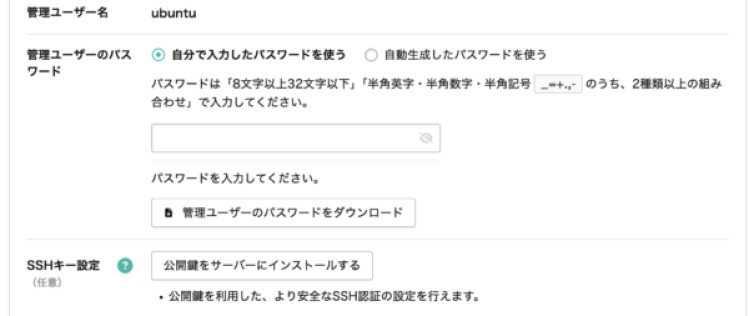
You’ll need to set an admin password.
SSH key setup is optional during signup.
To install a public key on the server, you must first register your account and generate an SSH key pair.
You can add the SSH key later from the control panel, so there’s no need to rush during signup.
As of now, there’s a 2-week free trial.
Note: during the trial, speed limits apply. You can disable the trial if you need full performance.
Sometimes there are promotional campaigns (e.g. 3 months free), but I just went with the 2-week trial this time.
Once you register, go to the control panel.
You should be able to access the OS via VNC or serial console.
Generating the Key Pair
Sakura’s VPS only supports SSH public key authentication—password login is disabled by default.
Run this command locally to generate a key pair:
ssh-keygen -t rsa -b 2048 -f ~/.ssh/id_rsaYou'll be prompted to set a passphrase in case the private key is leaked.
Enter passphrase (empty for no passphrase): *****The private key stays on your local machine, while the public key is uploaded to the remote server.
In this example, id_rsa.pub is the public key and id_rsa is the private key.
Typically, private keys go in .ssh inside your home directory (~/.ssh).
Ensure file permissions are correctly restricted.
Upload the public key from the VPS control panel under “SSH Key Management”.
Connecting via SSH
By default, SSH listens on port 22 and is open to 0.0.0.0.
From your local machine:
ssh -i ~/.ssh/id_rsa username@hostname -p 22After pressing Enter, you’ll be asked for the passphrase—then you’re in.
Initial usernames vary depending on the OS.
👉 Administrative User Info for Sakura VPS
For Ubuntu, the default user is ubuntu.
Notes
By default, Sakura’s Ubuntu VPS blocks root login and password authentication over SSH.
You can confirm or enforce this in your SSH config:
PermitRootLogin no
PasswordAuthentication no
Changing the SSH port can affect memory usage (footprint),
so if you have a fixed global IP, it’s better to whitelist IPs via firewall and keep the default port.
If using dynamic IPs (e.g. from GitHub Actions), restricting by IP might not be feasible—
in that case, changing the port could offer some protection.
In any case, use fail2ban to limit and detect brute-force attempts.